Blogtoberfest (Day15)
Yesterday I was in the city with my daughter and it seemed everywhere we looked we saw jewellery with roses made of zips. Sadly, they were mostly pretty shoddy - to the point that some of the zips were not even real! I still think this is a cool idea so I decided to have a bash at making my own version. This is what I made.
A necklace just right for Spring, with 4 "zip roses". This is what they look like close-up ...

I would like to try and share my method with you,so here goes ...
You will need a zip (duh!) - I used op-shop ones but you could buy new ones too. Now, the length of the zip determines the size of the rose. In the necklace the green and pink zips were shorties, the black one too but the orange one was quite long - probably about 35cms. Also, thread up your needle with matching thread before you start.

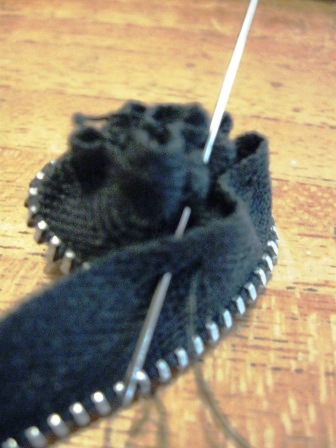
This is a lovely long one that I had lurking about - I am partial to the way the metal teeth look in the finished rose. Ok, so once you have selected your zip, you need to snip off the end with the stopper and remove the bit you use to close the zip.

Split the zip in half - you only use one half at a time and can join the other half on later if you decide to make the rose bigger.

Now you need to do a little folding manouvre. Fold down the top edge to create a triangle as shown below.

Then, you need to fold it over again to form a nice neat end.

Pinch the bit you have just folded together and start to roll it up, creating the centre of the rose.


 | ||

Voila!

I haven't decided what I will do with this one yet - probably a necklace or maybe attached to a cuff ? I hope the instructions make sense and that you get to make one for yourself!
6 comments:
That necklace is gorgeous!! I have seen a few different tutorials for making zipper roses and other fabric roses and yours is great!! I actually have an idea that I'm working on at the moment for a zipper necklace too, no roses though.
I saw some of those when I was traveling overseas, I thought they were cool and yours are cooler even.
I'm always collecting old zippers to make things with but haven't used any yet.
xoxo Kim
Thanks for taking the time to share your technique. I love that 'I can do that' attitude. And it's usually pulled off a million time better.
Hi Sue, I have found your website through Thea & Sami, Nice work will check out your store for some retail therapy! Have a great weekend, Lisa
I"M loving it, well done!
Thank you
I haven't seen any zip roses...till now...your tutorial looks great...thanks!
Post a Comment